I stole this idea from my friend Lisa, but what better way to share some of the fun things we've been up to lately? In no particular order....
1. No carbs. I gained a lot of weight while I was pregnant and once we moved to my parents' house, I finally felt organized enough to work on feeling healthy again. My mom read a book called Why We Get Fat, which is a fascinating look at the science behind nutrition and weight gain, and has since changed her eating lifestyle and doesn't eat many carbs. Low-carb diets have been good to me in the past so I jumped on her bandwagon and have seen some awesome results! I'm down 21 pounds with 4 more to go to reach my pre-pregnancy weight, and while I am no longer super strict about no carbs at all, there have been some definite lifestyle changes to come from this that I'm really happy about. (Note: I'm not necessarily recommending this as a diet to anyone - though I do recommend reading the book if you're interested.)
2. eMeals. Since moving to my parents' house and giving up carbs, Tim and I have had a hard time coming up with meals that are both tasty and, well, not the same thing every single night. eMeals to the rescue! When you subscribe to eMeals, you get to pick your meals (we just do dinner) and family size, and then they email you a weekly menu complete with a shopping list. It does cost money, but it's really not expensive and almost all of the meals we've tried have been really good. We've discovered that we need to schedule some leftover nights into each week so we don't buy food for all seven meals, but with a few modifications to fit our needs, it's been a lot of fun.
3. Learning to cook. Along with all this food business comes this astounding fact: I am learning to cook! Since Tim is at work and home fairly late each night, I have taken over making dinner and I have yet to completely ruin anything. Booyah. I have been lazy about it lately but I think next week will see a resurgence of these developing skills. Stay tuned...
4. Free printables. Again I'm borrowing from Lisa on this one. I don't know what it is but I am 100% obsessed with the printable posters designed by Gina at gdesigned.blogspot.com. I actually went to high school with Gina and I think her designs are fabulous! They are totally free and look great printed out on a regular printer. I especially love the alphabet name prints! Gina is super nice and will customize the name and colors for you. Georgie's is pretty much the cutest thing ever. I have downloaded about a dozen of my must-have favorites from Gina's site and given them as wedding, bridal shower, thank you, and birthday gifts just in the last six weeks.
5. Father's Day tie. For Mother's Day, Tim made Georgie and me matching skirts, so for Father's Day, I made Tim a tie and Georgie a matching skirt. I found this tie pattern and tutorial online and it turned out really well! Plus, it was not overly complicated which was perfect for my basic to intermediate sewing skills. I am actually excited to make him another tie that's even better, based on what I learned from the first go-round.
Side note: For Georgie's skirt, I modified a basic drawstring skirt by cutting the fabric into four panels (front, back, and sides) instead of two (front and back) before sewing them together and adding the ric rac drawstring.
6. Healthy Sleep Habits, Happy Child by Marc Weissbluth. Lots of people recommended this book to me when I was desperate to get Georgie to sleep and I wish I had had the mental energy to read it sooner! This was our best book for seeing pretty immediate results in G's sleeping habits (like actually taking naps at all - miracle!) and it helped us make sense of why she wasn't sleeping. As an added bonus, it mostly did not make me feel like a horrible parent as so many other sleep books have. Georgie still isn't sleeping through the night but we have come such a long way and I thank this book for it nightly.
7. The Mother in Me: Real-World Reflections on Growing into Motherhood, edited by Kathryn Lynard Soper. One more book to recommend. I've found that reading positive, encouraging, and honest essays about motherhood has helped me to be more positive myself and to see the precious parts of motherhood more clearly, and this book has been the absolute best so far. The beautiful essays and poems span all of motherhood from pregnancy to the toddler days and made me cry, laugh, and reflect a little more deeply on my own experiences. I'd love to discuss the book with anyone who reads it, or just have an open and honest discussion about motherhood in general because I think we've all got something to say.
Showing posts with label craftiness. Show all posts
Saturday, July 13, 2013
Friday, March 16, 2012
Real(ish) cratfy-ness
We work pretty far in advance at the magazines, so a couple of months ago we were putting together our March/April issue of Simply Handmade and we needed a few extra projects. I volunteered to make something and here it is!
Thursday, October 6, 2011
I've never slept so well
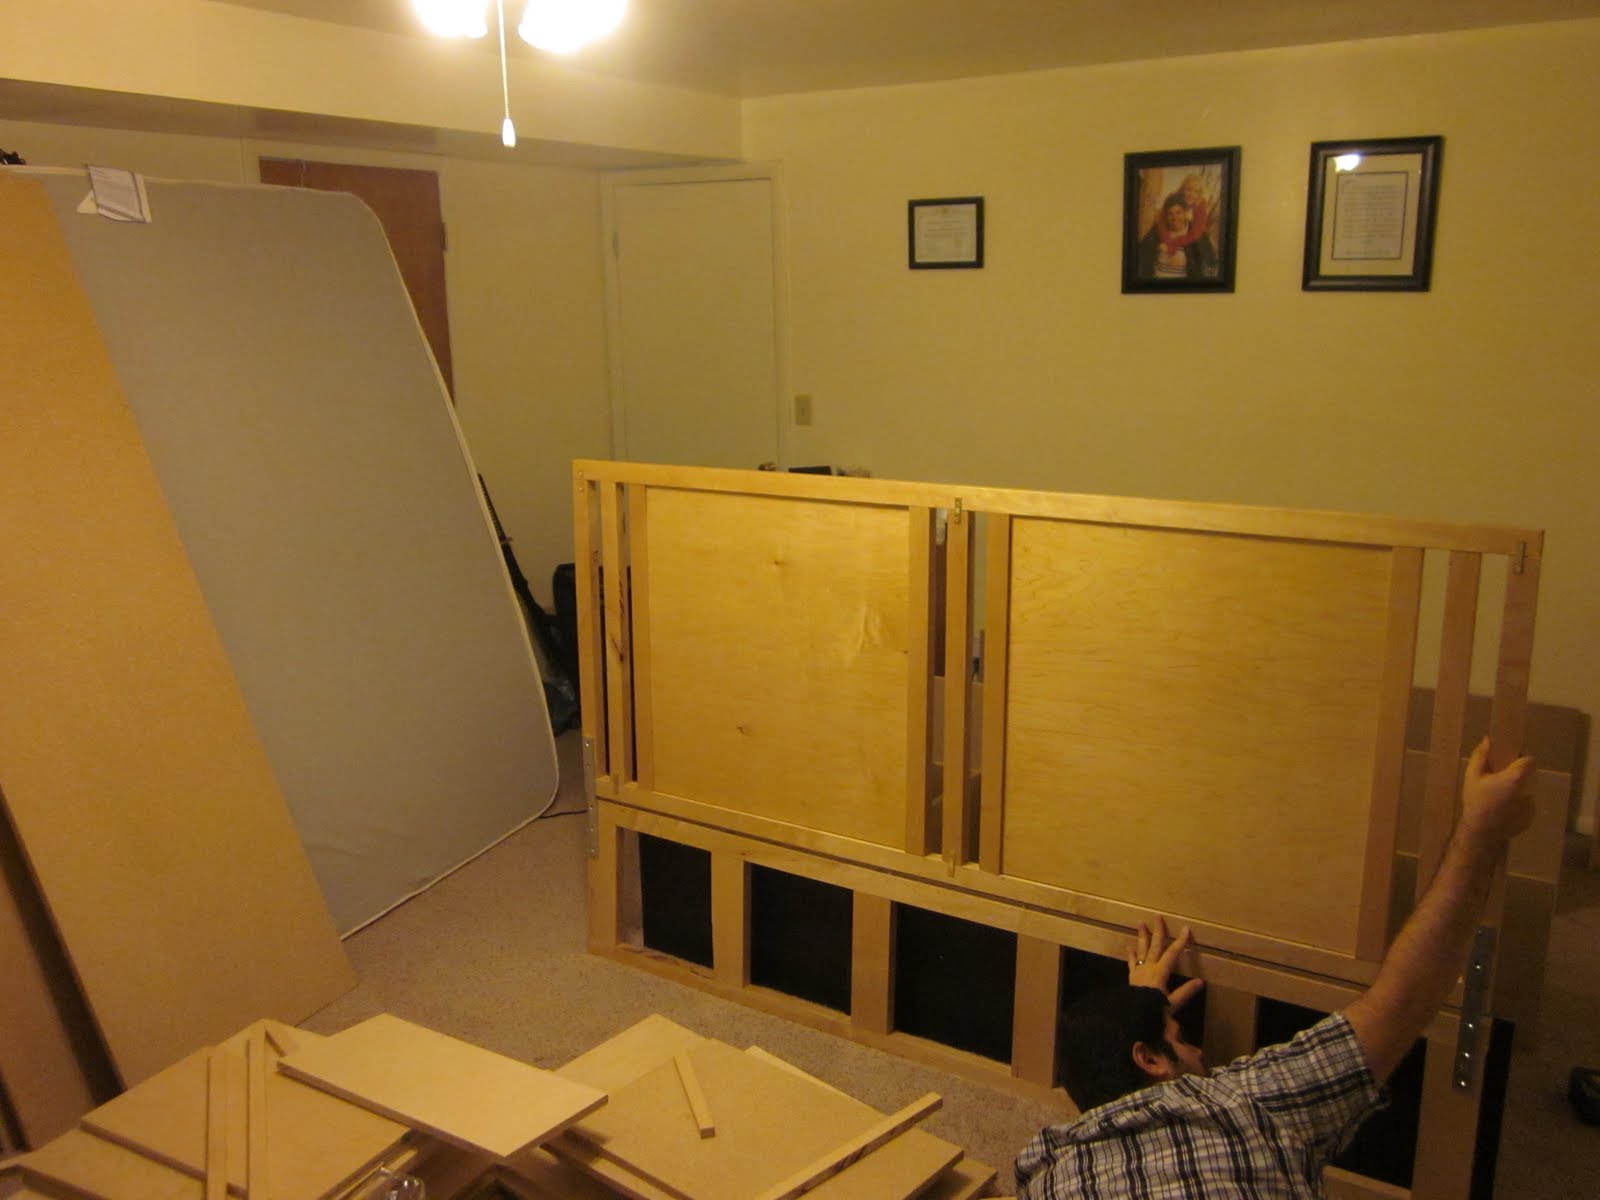
We finally have a real bed again! Not long after we got married, we bought a king-size foam mattress (Best. Decision. Ever.) but we didn't have a bed frame for it. Tim being the ingenious man that he is, designed a bed frame for us. He planned it out, calculated the measurements, bought the wood from the lumber yard he used to work for in California, spent a day cutting it with his brothers, and bit by bit, Tim put it together with lots of help from his brother Rob. They ran into all kinds of hitches, mainly a lack of tools and work space, but it's finally and beautifully done!
The final putting-together process:


And here's the finished product! (Ignore the mess on the dressers.)


I am so incredibly proud of Tim. He worked so hard and it paid off so much more incredibly than I imagined it would. (He's definitely the visionary in our family.) He calculated and re-calculated to make sure that the corners would fit exactly (and they did!) and even made plans to add drawers under the frame eventually. I love that he used a clear varnish so we could enjoy the beautiful natural maple wood.
And I'm so grateful for Paul and Rob for taking a whole day to help him cut all the wood, and especially grateful to Rob for seeing the job through to the end. Rob bought or helped buy most of the tools and was pretty much indispensable. We are so lucky to have such awesome brothers!
The final putting-together process:


And here's the finished product! (Ignore the mess on the dressers.)


I am so incredibly proud of Tim. He worked so hard and it paid off so much more incredibly than I imagined it would. (He's definitely the visionary in our family.) He calculated and re-calculated to make sure that the corners would fit exactly (and they did!) and even made plans to add drawers under the frame eventually. I love that he used a clear varnish so we could enjoy the beautiful natural maple wood.
And I'm so grateful for Paul and Rob for taking a whole day to help him cut all the wood, and especially grateful to Rob for seeing the job through to the end. Rob bought or helped buy most of the tools and was pretty much indispensable. We are so lucky to have such awesome brothers!
Thursday, September 29, 2011
Mini album, curtains, and quilt, oh my!
I don't know why I feel the need to put pictures of my projects on my blog, but these crafty projects are becoming a hobby and I just like sharing them with someone, even if it's just the blogging universe. So, here we go again!
For my dad's birthday, I made a mini album of our yearly trips to Snowbird for the Survivors at the Summit hike. I cut up my yellow volunteer shirt from last August's event to make little mini flags for the inside pages and I kinda love how they turned out. Next step, making one for myself!


Then I decided to make curtains for our bedroom, not because we didn't already have some, but because they were the same color as the walls and they didn't do a very good job of blocking out the sunlight in the mornings. We had/have a ton of leftover green material from the back of our ginormous quilt (pictures below) so I just trimmed, hemmed, made loops for the tops, and hung them up. I'm so proud that they turned out to be the right size! (And no, they don't match our current bedspread at all, but they'll match our winter quilt just fine.)


And now, introducing the biggest quilt anyone should ever attempt to make...

Ta-da! All the squares come from old shirts, shorts, pajamas, and pants. Tim and I started cutting the squares for this quilt not too long after we got married, I'm pretty sure, and we had so many that Tim suggested we make a huge picnic quilt. Thus began the loooong adventure! It took both of us plus three friends two days to tie the whole thing and it took me about four hours to bind it (between pinning some of the fabric, rolling it up, pinning the rest, and sewing). When we first laid out the squares, we had to remove all the furniture from our living room - it literally took up the entire room!

To give you a sense of its size, there are over 800 six inch squares and it is roughly the same square footage as five twin size quilts. It's approximately 12 feet wide and 16 feet long, and we had to purchase 11 yards of batting and 17 yards of material for the back. I think we decided it's about 30 or 40 pounds when it's all rolled up. I have no idea how many collective hours it took - a lot!

Everyone keeps asking what we're going to do with it (and how we're going to wash it) and the simple answer is, we just thought it would be cool to have a quilt that big, especially one we made. Next time we have a picnic, we can fit everyone on just one blanket. If we fold it up, it makes an excellent sleeping pad. It'll just be our family's special occasion quilt. (And we'll wash it in a kiddie pool in the backyard. Don't worry, we've thought this through.)
Thursday, August 25, 2011
Even more crafty-ness, can you handle it?
My crafty talents know no limits. That's not even true, but I had a lot of fun putting together this project and I love how it turned out!

Tim made me the jewelry box in the corner of the picture (yes, he MADE it from scratch, completely on his own - amazing!) but I have a couple of necklaces that either get tangled in the box or are just too big, so I went in search of something that would be an easy DIY necklace hanger project. I had this general idea in mind, but I found this project with the cork and the fabric here and that's what I followed.
To make: I measured out two pieces of cork to fit inside my frame, then covered them with spray adhesive and placed my fabric on them. (Recognize this fabric?) I wrapped the ends of the fabric around the back of the cork and let it all dry overnight. I sprayed my frame with blue paint (it look three layers to cover the original black), let it dry, and put the cork inside the frame. Done! Then I got to play with the placement of the pins and necklaces, which is almost the best part.

As a side note, I recently joined Pinterest, and I'll be honest, I didn't really get the appeal right at first. Then I started looking at people's boards and searching for projects and about four hours later, I understood the appeal. I have to be careful not to spend too much time on it or I never get off!

Tim made me the jewelry box in the corner of the picture (yes, he MADE it from scratch, completely on his own - amazing!) but I have a couple of necklaces that either get tangled in the box or are just too big, so I went in search of something that would be an easy DIY necklace hanger project. I had this general idea in mind, but I found this project with the cork and the fabric here and that's what I followed.
To make: I measured out two pieces of cork to fit inside my frame, then covered them with spray adhesive and placed my fabric on them. (Recognize this fabric?) I wrapped the ends of the fabric around the back of the cork and let it all dry overnight. I sprayed my frame with blue paint (it look three layers to cover the original black), let it dry, and put the cork inside the frame. Done! Then I got to play with the placement of the pins and necklaces, which is almost the best part.

As a side note, I recently joined Pinterest, and I'll be honest, I didn't really get the appeal right at first. Then I started looking at people's boards and searching for projects and about four hours later, I understood the appeal. I have to be careful not to spend too much time on it or I never get off!
Thursday, August 11, 2011
Crafty-ness, again
The more I work with crafts, the more I've realized that learning how to make beautiful things is within my reach. Tim and I have been working on a quilt together, but I've taken some time to make other projects too. Keep in mind that I only make easy projects, I only make practical projects, and I am paid to write instructions for how to make things like these, so forgive the instructions if you didn't want to know.
First, magnets! I made these a while ago, and I have another batch waiting to be made, but here are some easy magnets I made for myself and gave to my sister as a birthday gift:
How to make: Trace an clear acrylic rock (you can find them in all sizes at craft stores) onto pretty patterned paper, cut out the shape, and hot glue it to the back of the rock. Hot glue a magnet to the back of the paper, trim any excess paper from around the edges of the rock, and done! The hot glue does show through the acrylic though, so I've been looking for an equally strong adhesive that will work better.
Next up, baby blocks! I got this idea from our Create: For for the Home book, which is probably my very favorite magazine of any that we've published since I started working at Northridge. It took me two failed attempts to get these right, but I really like how they turned out. They're just fabric blocks that babies can throw, eat, and handle without anyone or anything getting damaged:
How to make: Cut out six equal squares of fabric and sew four of them side by side in a row. (Remember to sew with the right sides together so the seams are on the inside.) Sew one side of the fifth square along the top of the first block in the row; when you reach the end of the side, leave the needle in the fabric and rotate the row so the next side of the fifth square is lined up with the top of the second square. Do that for all four sides of the fifth square, then repeat with the sixth square on the bottom of the row. On the last side, leave a gap. Turn the block right side out, fill with stuffing (I used leftover quilt batting and then I started pulling stuffing from an old pillow we didn't use), and hand stitch the gap closed.
This next project is the one I think I'm most proud of: crayon holders that roll up (can't think of a more succinct name). They have little pockets for 12 crayons and then roll up neatly, perfect for little kids who need something to do at church. Again, these came straight from Create: For for the Home, and the best part was that I followed the instructions I wrote for the magazine exactly and they worked! I think that is a sign of true success, if you can follow your own step-by-steps and get the results you wanted.
How to make: If you want the full instructions, let me know, but essentially you place a folded piece of fabric along the bottom of a long strip and sew lines every 1" to make the pockets. Sew a hair tie to one end, then place your outside piece of fabric over the pockets, stitch around the edges (leaving a little gap), and turn it right side out. Hand stitch the gap closed and add a button to the outside for the hair tie to go over. (I messed up the button on the first one I tried, so I took it off and just used the hair tie to hold the roll-up closed.) And there you go! I can't wait to have nieces (and nephews, eventually) that are old enough to use these and not just eat the crayons.
Then, feeling cocky about my crayon success, I attempted a bag made out of old jeans. I've written instructions for a couple of bags for the magazines and though they are a little trickier that other projects, I saw that it was possible. I guess that's all I need, just a little possibility. I came up with the design for this bag myself and it didn't turn out at all like I originally planned, but for a first attempt, it wasn't too bad. I am most proud that the handles are A) the same length, and B) in the same place on each side of the bag.
How to make: First you cut out two pieces for the outside of the bag and two pieces for the lining inside the bag. You sew the inside pieces together, then the outside, then you sew them together around the top (inserting handles as you do), turn the bag right side out, and hand stitch the opening closed. Done. Okay, there's actually a little more to it than that, but that's the basic idea. And then, if you want, you can cut out three flowers, layer them, add a button to the center, and attach it to the bag.
Finally, for Rachel's graduation party during our weekend at Snowbird, I made some pom pom garlands out of yarn to make things a little more festive. The idea came from our November issue of Simply Handmade and they were SUPER easy:
How to make: Wrap yarn around your fingers about a hundred times. Tie yarn of the same color around the middle of the wrapped yarn and cut open the loops on either end. Trim the ends so they are more even and fluff to make a pom pom. String all the finished pom poms onto a length of yarn (the yarn is thick enough the pom poms will stay in place - I tried thread first but they just slid up and down), hang up your garlands, and enjoy!
So there you go: that's what crafy-ness looks like at my house lately. I think I'm getting better and more adventurous. And I'm also having a lot of fun, which is definitely the best part.
First, magnets! I made these a while ago, and I have another batch waiting to be made, but here are some easy magnets I made for myself and gave to my sister as a birthday gift:
How to make: Trace an clear acrylic rock (you can find them in all sizes at craft stores) onto pretty patterned paper, cut out the shape, and hot glue it to the back of the rock. Hot glue a magnet to the back of the paper, trim any excess paper from around the edges of the rock, and done! The hot glue does show through the acrylic though, so I've been looking for an equally strong adhesive that will work better.
Next up, baby blocks! I got this idea from our Create: For for the Home book, which is probably my very favorite magazine of any that we've published since I started working at Northridge. It took me two failed attempts to get these right, but I really like how they turned out. They're just fabric blocks that babies can throw, eat, and handle without anyone or anything getting damaged:
How to make: Cut out six equal squares of fabric and sew four of them side by side in a row. (Remember to sew with the right sides together so the seams are on the inside.) Sew one side of the fifth square along the top of the first block in the row; when you reach the end of the side, leave the needle in the fabric and rotate the row so the next side of the fifth square is lined up with the top of the second square. Do that for all four sides of the fifth square, then repeat with the sixth square on the bottom of the row. On the last side, leave a gap. Turn the block right side out, fill with stuffing (I used leftover quilt batting and then I started pulling stuffing from an old pillow we didn't use), and hand stitch the gap closed.
This next project is the one I think I'm most proud of: crayon holders that roll up (can't think of a more succinct name). They have little pockets for 12 crayons and then roll up neatly, perfect for little kids who need something to do at church. Again, these came straight from Create: For for the Home, and the best part was that I followed the instructions I wrote for the magazine exactly and they worked! I think that is a sign of true success, if you can follow your own step-by-steps and get the results you wanted.
How to make: If you want the full instructions, let me know, but essentially you place a folded piece of fabric along the bottom of a long strip and sew lines every 1" to make the pockets. Sew a hair tie to one end, then place your outside piece of fabric over the pockets, stitch around the edges (leaving a little gap), and turn it right side out. Hand stitch the gap closed and add a button to the outside for the hair tie to go over. (I messed up the button on the first one I tried, so I took it off and just used the hair tie to hold the roll-up closed.) And there you go! I can't wait to have nieces (and nephews, eventually) that are old enough to use these and not just eat the crayons.
Then, feeling cocky about my crayon success, I attempted a bag made out of old jeans. I've written instructions for a couple of bags for the magazines and though they are a little trickier that other projects, I saw that it was possible. I guess that's all I need, just a little possibility. I came up with the design for this bag myself and it didn't turn out at all like I originally planned, but for a first attempt, it wasn't too bad. I am most proud that the handles are A) the same length, and B) in the same place on each side of the bag.
How to make: First you cut out two pieces for the outside of the bag and two pieces for the lining inside the bag. You sew the inside pieces together, then the outside, then you sew them together around the top (inserting handles as you do), turn the bag right side out, and hand stitch the opening closed. Done. Okay, there's actually a little more to it than that, but that's the basic idea. And then, if you want, you can cut out three flowers, layer them, add a button to the center, and attach it to the bag.
Finally, for Rachel's graduation party during our weekend at Snowbird, I made some pom pom garlands out of yarn to make things a little more festive. The idea came from our November issue of Simply Handmade and they were SUPER easy:
How to make: Wrap yarn around your fingers about a hundred times. Tie yarn of the same color around the middle of the wrapped yarn and cut open the loops on either end. Trim the ends so they are more even and fluff to make a pom pom. String all the finished pom poms onto a length of yarn (the yarn is thick enough the pom poms will stay in place - I tried thread first but they just slid up and down), hang up your garlands, and enjoy!
So there you go: that's what crafy-ness looks like at my house lately. I think I'm getting better and more adventurous. And I'm also having a lot of fun, which is definitely the best part.
Wednesday, March 23, 2011
What crafty looks like at my house
Last week, there was an evening in which I got really restless, like I needed to clean or organize something. In desperation, I finally turned to Tim and said, "I need a project. Give me a project!" Like the wonderfully obliging husband he is, he did. He reminded me that we had talked about creating some kind of holder for our remotes (there are three) that would attach to our couch. I got to work and twenty minutes later...

Okay, it's not that impressive. It was actually super easy--exactly my kind of project. I just cut off one of the pant legs of an old pair of Tim's jeans (that was in the to-be-quilted pile), folded the back pocket up, and sewed the sides with the right sides together. Turned it right side out and presto--a big pocked with a smaller one on the outside. I left the long strip of pant leg as long as it was so that we could hang the pocket on the back of the couch and tuck the rest underneath the couch cushions. To make myself feel crafty and to avoid raw edges, I hemmed the sides and the top edge. It's been a perfect solution to our usual "Where's the remote?" "Which one?" "All of them..." routine.
Then, not satisfied with one craft accomplishment, I create this little beauty:

Again, not that impressive and super easy. I don't have a pincushion and so after writing up instructions for a really cute one that will be featured in one of our upcoming magazines, I decided to give it a try. I just cut out four equal-sized rectangles (all from the scrap pile, I might add), sewed them together, and then hand stitched a larger piece to the bottom. I stuffed it with leftover batting and trimmed the edges to be somewhat scalloped. And for good measure, I added a flower and a button to the center. Very cute.
But where, you might ask, am I getting all these scraps of fabric and batting? Well, I might answer, I finally finished this quilt I've been working on...

Possibly the most eclectic quilt ever, but I really like it. Every square is from a shirt or pair of pajama pants that I was too sentimental to just throw away. I can chart most of high school and some of college with this quilt, and I really like the way the border turned out.
So there you have it: proof of my craftiness. Ta-da!

Okay, it's not that impressive. It was actually super easy--exactly my kind of project. I just cut off one of the pant legs of an old pair of Tim's jeans (that was in the to-be-quilted pile), folded the back pocket up, and sewed the sides with the right sides together. Turned it right side out and presto--a big pocked with a smaller one on the outside. I left the long strip of pant leg as long as it was so that we could hang the pocket on the back of the couch and tuck the rest underneath the couch cushions. To make myself feel crafty and to avoid raw edges, I hemmed the sides and the top edge. It's been a perfect solution to our usual "Where's the remote?" "Which one?" "All of them..." routine.
Then, not satisfied with one craft accomplishment, I create this little beauty:

Again, not that impressive and super easy. I don't have a pincushion and so after writing up instructions for a really cute one that will be featured in one of our upcoming magazines, I decided to give it a try. I just cut out four equal-sized rectangles (all from the scrap pile, I might add), sewed them together, and then hand stitched a larger piece to the bottom. I stuffed it with leftover batting and trimmed the edges to be somewhat scalloped. And for good measure, I added a flower and a button to the center. Very cute.
But where, you might ask, am I getting all these scraps of fabric and batting? Well, I might answer, I finally finished this quilt I've been working on...

Possibly the most eclectic quilt ever, but I really like it. Every square is from a shirt or pair of pajama pants that I was too sentimental to just throw away. I can chart most of high school and some of college with this quilt, and I really like the way the border turned out.
So there you have it: proof of my craftiness. Ta-da!
Wednesday, March 9, 2011
Some things I love
I feel like not much has been happening lately--it's just the same old, same old. Work, school, work, callings, work, house. And then all of a sudden, the pace picked up and life started to happen and big things might be changing. (No, I'm not pregnant.) I'm not going to tease you with all the things that are potentially going to happen until they are more official, but I will say that it's been so interesting to see how things fall into place when they are supposed to, and how things that didn't make sense earlier suddenly fit together. The lull in exciting things was nice, but I can't wait to see where these new developments are heading. (Is that enough of a teaser for you?)
So instead of news, a list of things I love, in no particular order (it's an update in its own way):
1. Our new shower curtain. Seriously, possibly the most exciting thing that happened last month was getting a new shower curtain, liner, and shower curtain rings. That really says something about last month, I think...
2. Our new griddle! I think Tim has cooked on it every other day since we got it (on mega sale, I might add), and I love it.
3. My sewing machine. I've been trying out some of the cute projects I've written up at work and it's just so much fun. Pictures to come...
4. Along those same lines, finishing my quilt! I still need to tie it, but I started this t-shirt/pajama pants quilt when I still lived in Provo...three years ago. Yeah, it's time to get it done.
5. Parking in the garage. Tim always gets home before me in the evenings (and usually leaves after me in the mornings), but he lets me park in the garage. Not just because my car fits better--because he's just that sweet.
6. Community. Oh. My. Hysterical. It's been a really, really long time since I laughed so hard at a TV show. Seriously.
7. Modern Family, the other best thing on TV. We started to catch up on the last few episodes and it was so great to watch it again.
8. My calling in the Primary. I'm the first counselor in our ward's Primary presidency and I love it! It took a few weeks to get used to it, especially because we have a very active and energetic Junior Primary, but the kids are so cute and funny and I am feeling more comfortable with it now. It's something I actually look forward to every week, if you can believe it.
9. Crystal Light drinks. Sugar-free and low calorie and soooo delicious.
10. Days that feel like spring. There have been a few delicious days of sunshine and warm breezes, and as soon as I get that whiff of grass and dirt, I get so excited for spring to come!
So instead of news, a list of things I love, in no particular order (it's an update in its own way):
1. Our new shower curtain. Seriously, possibly the most exciting thing that happened last month was getting a new shower curtain, liner, and shower curtain rings. That really says something about last month, I think...
2. Our new griddle! I think Tim has cooked on it every other day since we got it (on mega sale, I might add), and I love it.
3. My sewing machine. I've been trying out some of the cute projects I've written up at work and it's just so much fun. Pictures to come...
4. Along those same lines, finishing my quilt! I still need to tie it, but I started this t-shirt/pajama pants quilt when I still lived in Provo...three years ago. Yeah, it's time to get it done.
5. Parking in the garage. Tim always gets home before me in the evenings (and usually leaves after me in the mornings), but he lets me park in the garage. Not just because my car fits better--because he's just that sweet.
6. Community. Oh. My. Hysterical. It's been a really, really long time since I laughed so hard at a TV show. Seriously.
7. Modern Family, the other best thing on TV. We started to catch up on the last few episodes and it was so great to watch it again.
8. My calling in the Primary. I'm the first counselor in our ward's Primary presidency and I love it! It took a few weeks to get used to it, especially because we have a very active and energetic Junior Primary, but the kids are so cute and funny and I am feeling more comfortable with it now. It's something I actually look forward to every week, if you can believe it.
9. Crystal Light drinks. Sugar-free and low calorie and soooo delicious.
10. Days that feel like spring. There have been a few delicious days of sunshine and warm breezes, and as soon as I get that whiff of grass and dirt, I get so excited for spring to come!
Monday, February 28, 2011
Where I work, continued
To contrast the hijinks from a previous post, here are photos of my office:
The mess on my desk is a project that I am currently writing text for and the box of projects I'm working on.

These are the boxes of projects that I've either written text for or are waiting for text. Actually, only a few boxes are waiting for text. I'm catching up!

If it looks like a lot of work, that's because it is, heh. And by "writing text" I mean that I type up the name of the project (the scrapbook page, card, mini album, or other project), the name of the person who made it, the dimensions, the supplies used to make it, some kind of tip, and most of the time, instructions on how to recreate it. I've gotten very, very good at figuring out how things are made, I'm not going to lie. And considering I had zero crafting experience when I started, I consider this quite the accomplishment.
I get a lot of blank looks when I tell people I work for a scrapbooking/crafting magazine. Like, completely blank, bewildered, confused looks. Like they don't know what scrapbooking is, or they can't imagine anyone ever wanting to be in that business. I also get the feeling that people don't realize how big the scrapbooking industry is. Ours is actually the only publishing company that has increased the number of magazines we're publishing, rather than cutting back. We don't have a lot of ads or editorial articles--almost all we publish are reader submissions. So someone who just does this as a hobby could get her card or layout or home decor project published in one of our magazines. It's kinda cool, and one of the reasons we're still in business. We actually have readers/submitters from all over the United States, as well as England, Germany, Switzerland, Canada, Mexico, Australia, the South Pacific, and South Africa, to name a few.
In all honestly, the work I do and the words I write aren't life-changing. Somedays it seems very trivial. But there are hundreds of women around the world who read (okay, skim) what I write. To the company I work for, what I do definitely matters and is appreciated. And really, I can't ask for much better than that.
The mess on my desk is a project that I am currently writing text for and the box of projects I'm working on.

These are the boxes of projects that I've either written text for or are waiting for text. Actually, only a few boxes are waiting for text. I'm catching up!

If it looks like a lot of work, that's because it is, heh. And by "writing text" I mean that I type up the name of the project (the scrapbook page, card, mini album, or other project), the name of the person who made it, the dimensions, the supplies used to make it, some kind of tip, and most of the time, instructions on how to recreate it. I've gotten very, very good at figuring out how things are made, I'm not going to lie. And considering I had zero crafting experience when I started, I consider this quite the accomplishment.
I get a lot of blank looks when I tell people I work for a scrapbooking/crafting magazine. Like, completely blank, bewildered, confused looks. Like they don't know what scrapbooking is, or they can't imagine anyone ever wanting to be in that business. I also get the feeling that people don't realize how big the scrapbooking industry is. Ours is actually the only publishing company that has increased the number of magazines we're publishing, rather than cutting back. We don't have a lot of ads or editorial articles--almost all we publish are reader submissions. So someone who just does this as a hobby could get her card or layout or home decor project published in one of our magazines. It's kinda cool, and one of the reasons we're still in business. We actually have readers/submitters from all over the United States, as well as England, Germany, Switzerland, Canada, Mexico, Australia, the South Pacific, and South Africa, to name a few.
In all honestly, the work I do and the words I write aren't life-changing. Somedays it seems very trivial. But there are hundreds of women around the world who read (okay, skim) what I write. To the company I work for, what I do definitely matters and is appreciated. And really, I can't ask for much better than that.
Thursday, January 27, 2011
Inspired

I've been reading a lot of blog posts lately that have really fueled my desire to be creative. Not just in a crafty way (though clearly, I've been doing more of that too...see pillow cases below) but in all ways. I've been thinking about my writing and how I've let it slide. I've been thinking about my other skills and talents that I haven't given much attention to in a while, and I miss the thrill of playing a piano piece flawlessly and the satisfaction of finding the right word to express myself.
One of the posts in particular talked about creation as a part of healing: "Creativity and its power to heal resides in each of us--we each have different time, talent and financial constraints, but with a bit of soul searching, everyone can find a healing art."
The more I've thought about that, the more it has resonated with me. Creativity, or rather, the power of creation, can be a constant in both tough times and good times. Creativity is our innermost expression of beauty and love and order and emotion, and to find a way of expressing ourselves when emotions are at their deepest is infinitely valuable.
Lately I've just been inspired by everything. Not just blog posts and submissions at work, but also the way the sun and clouds shape the mountains when I drive to work every morning, and the memory of first falling in love with my husband. Strangely, or perhaps not so strangely, I've been itching to redecorate or rearrange my house. I have never before considered it "creative," but I think that homemaking, however outdated that term may be, can be a form of creativity. I think it might be one of my own creative outlets, my way of creating daily beauty. And what I've noticed is that I am a better, happier, more giving person when I have created something, whether it is a clean kitchen or a row of quilt squares or a blog post. In giving part of myself, I am fulfilled.
One more quote to end with:
"I am reminded in a world of force and power that some of the greatest power lies in the simple beautiful acts of creation. There is something in the visual buzz of colors on canvas, the exalting crescendos of music, the rhythmic word cadence of a poem, the captivating narrative of a book, the embodiment of an experience in a play or a film that seems to dance in our consciousness. Art is personal if it touches our spirit in a unique way. It lifts us, exalts, makes us feel the depth and measure of our experience. I believe in God because of the testaments of great art created by man....The arts have a way of stilling or enlivening our souls, in resonating with our humanity and divinity. They serve as companions through the experiences of our lives."
Amen and amen.
Thursday, January 20, 2011
Crafty-ness
Confession: I'm not a crafty person. I work for a publishing company that produces six scrapbooking/card/jewelry/crafting magazines, I write the text for five of them, and yet, I do not consider myself a crafty person. Part of it is the lack of resources; even if I wanted to scrapbook my photos, I don't have the tools I need to make it look nice. But I admit that the larger part of it is that most of the time, I lack the patience. I like to get things done, and if I don't know what I'm doing, my creative energy tires out fairly quickly.
That being said, I do like projects. I really do. I like having something to work on over a longish period of time, goals to mark off, a sense of creative accomplishment. So, with that introduction, I have pictures of my first (successful) crafty project, made with my new sewing machine from Christmas!
Exhibit A: One of the ugly throw pillow that came with our couch

Exhibit B: One of the pretty pillowcases I made (it took me only three tries to get it perfect)

Exhibit C: My couch with my pretty pillows

Ta-da! It's so silly, but I am proud of my pillowcases. This is the first thing I've made with my sewing machine and it turned out pretty darn good. Next challenge: finding something to do with all the leftover material...
That being said, I do like projects. I really do. I like having something to work on over a longish period of time, goals to mark off, a sense of creative accomplishment. So, with that introduction, I have pictures of my first (successful) crafty project, made with my new sewing machine from Christmas!
Exhibit A: One of the ugly throw pillow that came with our couch

Exhibit B: One of the pretty pillowcases I made (it took me only three tries to get it perfect)

Exhibit C: My couch with my pretty pillows

Ta-da! It's so silly, but I am proud of my pillowcases. This is the first thing I've made with my sewing machine and it turned out pretty darn good. Next challenge: finding something to do with all the leftover material...
Wednesday, October 6, 2010
The Problem with My Solution to My Problem
I remembered why I'm not usually crafty: I have no patience for it.
If I can throw something together and have it look great, awesome. I'm all about efficiency, not quality. It's a sad fact, but it's true. So if I don't have the tools readily available that I need to make something amazing, I will settle for something less-stellar without hesitation. Should I work on changing this? Possibly...but probably not anytime soon.
Ah well. I will still make some awesomely crafty things...I just won't take much time to do so once I start...
If I can throw something together and have it look great, awesome. I'm all about efficiency, not quality. It's a sad fact, but it's true. So if I don't have the tools readily available that I need to make something amazing, I will settle for something less-stellar without hesitation. Should I work on changing this? Possibly...but probably not anytime soon.
Ah well. I will still make some awesomely crafty things...I just won't take much time to do so once I start...
Thursday, September 30, 2010
My Problem
There is one small problem with this new job that I love, and it is, to put it simply, that it makes me feel monumentally inadequate. All day long, I hold and handle the creative works of other women. I study how they were made and I look for unusual or especially creative elements. And I often come away feeling like an uninspired lump of nothing. I mean, I am technically a Master of Fine Arts--"creative" is practically in my title. And yet, I am not making anything of my own. It makes me feel very insecure about who and what I profess to be.
The truth is (personal confession--indulge me), I spend a lot of my time feeling insecure. I don't like this about myself, but I worry about other people's opinions of me, even people I know love me. I wonder and worry quite a lot if I'm doing things "right." Any discontent I feel about anything--my clothes, my house, my weight, my blog--almost always comes out of the suspicion that someone else does it better. I know that in general, women are prone to the deadly sin of comparison (and therefore never think of ourselves as "enough"), but it's not just a comparison. It's that somehow my choices are inherently flawed because I didn't do things the way other people did--I didn't do it "right."
Sometimes I even worry about who I am: Am I nice enough? Am I too nice? Am I nice for the right reasons? Do I spend enough time with my family? With my friends? Am I being unreasonable? Am I being a pushover? Over and over, my inner dialogue second guesses everything about myself.
The practical part of me just read over that last part and rolled her eyes. Sheesh, just be who you are and stop worrying about it, she said. And I do listen to that voice most of the time. I've worked hard for more than half of my twenty-four years to be more confident and sure of decisions and myself. But there are days (especially lately, triggered by my job) when I lose that sense of who I am. Days when I stop asking what I like and only worry what other people will like. Days when I forget whose opinions actually matter. Days when I'm lost.
I told my sister-in-law the other week that sometimes we need to let ourselves cry. We need to admit to and experience our negative emotions so that we can truly move past them. But now, I'm not sure that's completely true. Yes, we do need to feel what we feel, but there is a point when it just becomes self-indulgent.
So.
I am going to battle my insecurities and reclaim my creative identity.
I have a list of projects I want to do (some of which I've already started), I have a book of writing prompts I'm going to work my way through, and I am going to work on that whole staying-confident-at-all-times thing. If I need to, I am going to make a list of things I like because I like them. (I'm thinking of that scene in Runaway Bride when Julia Roberts tries all the different kinds of eggs...) And I'm going to remind myself daily that the list of people whose opinions I should listen to is much shorter than I think it is.
I realize this was a very self-indulgent post, and I hope you'll forgive me. I also hope you know what I'm talking about--the pull of insecurity and self-doubt and push of confidence and action. If not...well, lucky you. :)
Maybe someday I will learn to speak up for my opinions a little more. Or maybe I will learn not to care what other people think. Or maybe I will finally figure out how to hang on to my identity, regardless of whose beautiful projects I am writing about.
The truth is (personal confession--indulge me), I spend a lot of my time feeling insecure. I don't like this about myself, but I worry about other people's opinions of me, even people I know love me. I wonder and worry quite a lot if I'm doing things "right." Any discontent I feel about anything--my clothes, my house, my weight, my blog--almost always comes out of the suspicion that someone else does it better. I know that in general, women are prone to the deadly sin of comparison (and therefore never think of ourselves as "enough"), but it's not just a comparison. It's that somehow my choices are inherently flawed because I didn't do things the way other people did--I didn't do it "right."
Sometimes I even worry about who I am: Am I nice enough? Am I too nice? Am I nice for the right reasons? Do I spend enough time with my family? With my friends? Am I being unreasonable? Am I being a pushover? Over and over, my inner dialogue second guesses everything about myself.
The practical part of me just read over that last part and rolled her eyes. Sheesh, just be who you are and stop worrying about it, she said. And I do listen to that voice most of the time. I've worked hard for more than half of my twenty-four years to be more confident and sure of decisions and myself. But there are days (especially lately, triggered by my job) when I lose that sense of who I am. Days when I stop asking what I like and only worry what other people will like. Days when I forget whose opinions actually matter. Days when I'm lost.
I told my sister-in-law the other week that sometimes we need to let ourselves cry. We need to admit to and experience our negative emotions so that we can truly move past them. But now, I'm not sure that's completely true. Yes, we do need to feel what we feel, but there is a point when it just becomes self-indulgent.
So.
I am going to battle my insecurities and reclaim my creative identity.
I have a list of projects I want to do (some of which I've already started), I have a book of writing prompts I'm going to work my way through, and I am going to work on that whole staying-confident-at-all-times thing. If I need to, I am going to make a list of things I like because I like them. (I'm thinking of that scene in Runaway Bride when Julia Roberts tries all the different kinds of eggs...) And I'm going to remind myself daily that the list of people whose opinions I should listen to is much shorter than I think it is.
I realize this was a very self-indulgent post, and I hope you'll forgive me. I also hope you know what I'm talking about--the pull of insecurity and self-doubt and push of confidence and action. If not...well, lucky you. :)
Maybe someday I will learn to speak up for my opinions a little more. Or maybe I will learn not to care what other people think. Or maybe I will finally figure out how to hang on to my identity, regardless of whose beautiful projects I am writing about.
Subscribe to:
Posts (Atom)

.jpg)